10 Lightroom tips for beginners
Reading Time: 14 minsAre you a Lightroom beginner and feeling overwhelmed? Lightroom can seem daunting, but it can become an indispensable tool for photography with the right tips and tricks. Here are 10 Lightroom tips for beginners that will help you make the most of this powerful software. From importing images to exporting them in perfect quality, these Lightroom tips will get you up to speed quickly so that you can start editing photos like a pro!
Table of Contents:
1. Interface

Understand Lightroom Interface: Before you start working on an image, the first step should be to familiarize yourself with the Lightroom interface. Lightroom is a powerful image editing software made by Adobe that can be used to enhance, organize, and export digital photos. One of the first steps to take when beginning Lightroom is to familiarize yourself with the Lightroom interface. Lightroom’s interface consists of five primary tabs:
- Library
- Develop
- Map
- Book
- Slideshow
The Library tab lets you view all your images and manage them. You can create collections of photos, sort images by date taken or edited, tag images with keywords, and rate images. This tab allows you to quickly edit batches of photos and perform more complicated tasks like creating virtual copies of an image or merging two different versions.
The Develop tab is Lightroom’s main editing window. Here you can adjust the white balance, exposure levels, Contrast, saturation, and sharpness of your images. Lightroom also offers several powerful tools for making local adjustments, like dodging and burning shadows and highlights or using brush tools for selective alterations. It also includes noise reduction features to help you clean up grainy photographs.
The Map tab lets you geotag your photos to plot them on a world map in Lightroom’s library view. This feature helps you track the locations where your photographs were taken and search for any nearby landmarks or geographic features associated with them.
The Book module allows users to create photo books from within Lightroom easily. You can design entire books, including photo layouts and text descriptions, without having to leave Lightroom at all!
The Slideshow module lets you quickly assemble slideshows from groups of photos you selected in the library view or develop mode. You can add music tracks and other effects to your slideshows to look more professional when shared with others online or printed out as physical copies.
These are just some essential tips for getting started with Lightroom as a beginner photographer, but they should be enough to quickly get started and become familiar with the program! With practice and patience, anyone can master Lightroom, so don’t be afraid to dive in head first!
2. Import Images
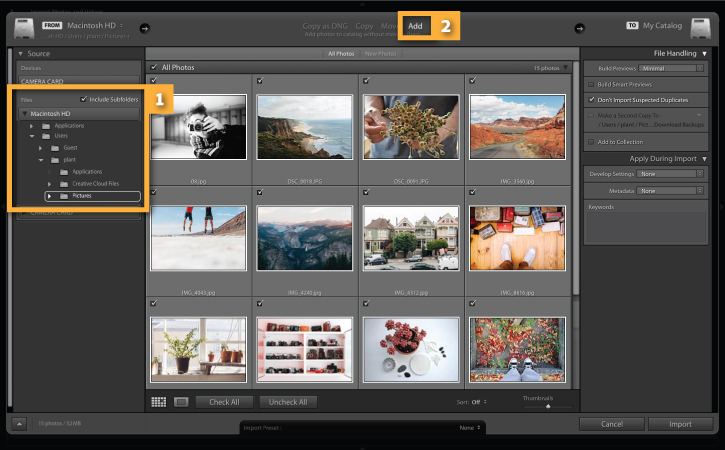
Make sure to import your photos into Lightroom with proper settings to maximize image quality and make it easier to work with. One of the most important things for beginners to understand when it comes to Lightroom is correctly importing images into Lightroom. Importing images incorrectly can lead to poor image quality and a much more difficult working experience. Here are a few tips on adequately importing your photos to ensure you get the best results when using Lightroom.
First off, when importing images into Lightroom, make sure that you select the highest resolution possible. Lightroom offers several different settings when importing your photos, including small previews and full-size JPEGs, so choose the highest resolution available. This will ensure that Lightroom has access to all the information in your images, which will be helpful for later editing.
It’s also important to check the color profile settings when importing images into Lightroom, as this can affect image quality. If shooting in RAW, ensure that Lightroom is set up to recognize the specific RAW file format, as this provides optimal results while editing. Lightroom also offers options such as color space and bit depth settings, so ensure these are set correctly before beginning work on an image.
Another crucial step when importing images into Lightroom is ensuring they are backed up safely in multiple locations. Lightroom allows users to store their photos on external hard drives or cloud storage services like Dropbox, so make sure your photos are always safe and accessible by backing them up regularly.
Finally, once you have finished importing images into Lightroom, it’s time to organize them into collections for easy access and organization later. Lightroom’s library view makes it easy for users to manage their photos by creating albums and compilations based on specific topics or themes from within Lightroom itself. This helps simplify finding particular images quickly when needed for future editing sessions or exporting purposes.
These steps should help beginner photographers get started with Lightroom quickly and efficiently while ensuring maximum image quality throughout their workflow! With practice and patience, anyone can master Lightroom, so don’t be afraid to dive in head first!
3. White Balance

Adjusting the white balance will help to ensure that colors appear natural and accurate in the finished product. Lightroom is an effective editing program with various tools and features to help photographers create stunning images. Adjusting white balance is one of those features that can be used to ensure the colors in your photos appear natural and accurate.
White balance is a photo’s color temperature, and Lightroom allows users to easily adjust this setting with its White Balance tool. The device contains several presets such as Daylight, Cloudy, Shade, Tungsten, Fluorescent, Flash, and Custom. The preset settings can be used to apply appropriate white balance settings for different lighting situations quickly. Still, Lightroom also offers the ability to adjust the white balance to get more fine-tuned results manually.
When adjusting the white balance manually, it’s essential to understand what you are trying to achieve first before making any changes. Lightroom allows users to accommodate four different values – Temperature, Tint, Exposure Compensation, and Hue – so understanding how each setting affects your image is vital when making adjustments.
The Temperature slider adjusts the overall warmth of an image, while the Tint slider adjusts its magenta/green hue. The Exposure Compensation slider allows users to make fine-tuned brightness adjustments, whereas Hue compensates for any perceived color casts to get more accurate colors in your photos.
The White Balance tool also includes an eyedropper that can select a neutral gray area of an image when attempting manual adjustments. This will help Lightroom establish an ideal white balance point which should create more natural-looking colors in your photos when finished processing them.
Adjusting white balance correctly can have a significant impact on how vibrant and accurate colors appear in your images, so it’s important
4. Exposure

When fine-tuning exposure, pay attention to both highlights and shadows and adjust accordingly until you have balanced out the overall effect of the photo. Lightroom is an effective photo editing program offering users various tools and features to create stunning images. Lightroom can help anyone take their photography to the next level, whether a beginner or a more advanced user.
One of Lightroom’s key features is its Exposure sliders, allowing users to adjust their images’ brightness, Contrast, highlights, shadow contrasts, and black points. When fine-tuning exposure, attention to highlights and shadows is essential to achieve a smooth tonal range throughout the image. Adjusting the exposure in Lightroom can be done manually using the Exposure slider or automatically using Lightroom’s Auto Tone feature.
When adjusting exposure manually, you must understand what you are trying to achieve before making any changes. Lightroom allows users to accommodate six different values – Exposure, Contrast, Highlights, Shadows, Whites, and Blacks – so understanding how each setting affects your image is essential when making adjustments.
The Exposure slider determines the overall brightness of an image. In Contrast, the Contrast slider increases or decreases the general difference between light and dark tones. In contrast, Highlights and Sshadowsliders control how bright or certain dark areas of an image appear, respectively. At the same time, Whites adjust white clipping levels, and Blacks adjust black clipping levels.
Lightroom also offers integration with third-party Plugins such as Topaz Labs for those who want even more control over their photos’ exposure settings. The Exposure tool gives users access to features like Topaz’s AI Clear technology, which can reduce noise on high ISO images if needed.
Lightroom’s powerful yet easy-to-use tools for adjusting exposure make it possible for virtually anyone to balance out their photos’ overall effect quickly and effortlessly! With practice and patience, anyone can master Lightroom, so don’t be afraid to dive in head first!
5. Colors

Utilize color curves, hue/saturation adjustments, and split toning controls to create more dynamic colors in your images. Lightroom’s Color tool offers users a variety of ways to adjust and enhance their photos’ colors. Lightroom allows for precise color editing by using an array of color curves, hue/saturation adjustments, and split toning controls, which can create more dynamic colors in your images.
The Color Curves tool allows users to edit the different channels in their photos, such as red, green, blue, yellow, cyan, and magenta. By adjusting the curve points in each channel, you can precisely control the colors and tones in your photo. This tool is excellent for fine-tuning any unwanted color casts or hue shifts that might have taken place during shooting.
The Hue/Saturation adjustment allows Lightroom users to alter the hue and intensity of specific colors within their photographs while also giving them access to Lightroom’s saturation sliders, which can increase or decrease color vibrancy levels as needed. These adjustments are significant for creating eye-catching images with more visually appealing colors.
Finally, Lightroom also includes Split Toning options which let you add cool or warm hues depending on the overall look you are trying to achieve with your image. The Highlights slider enables you to choose a single shade to apply to the lighter tones within your photograph, whereas the Shadows slider does the same but with darker tones. This is a great way to give your images some extra visual punch without having to use overly complicated techniques!
Overall, Lightroom can help photographers quickly and easily enhance their photos’ colors through its robust yet intuitive tools like Color Curves, Hue/Saturation adjustments, and Split Toning controls, all of which allow users to create beautiful images with more vivid and dynamic colors!
6. Contrast
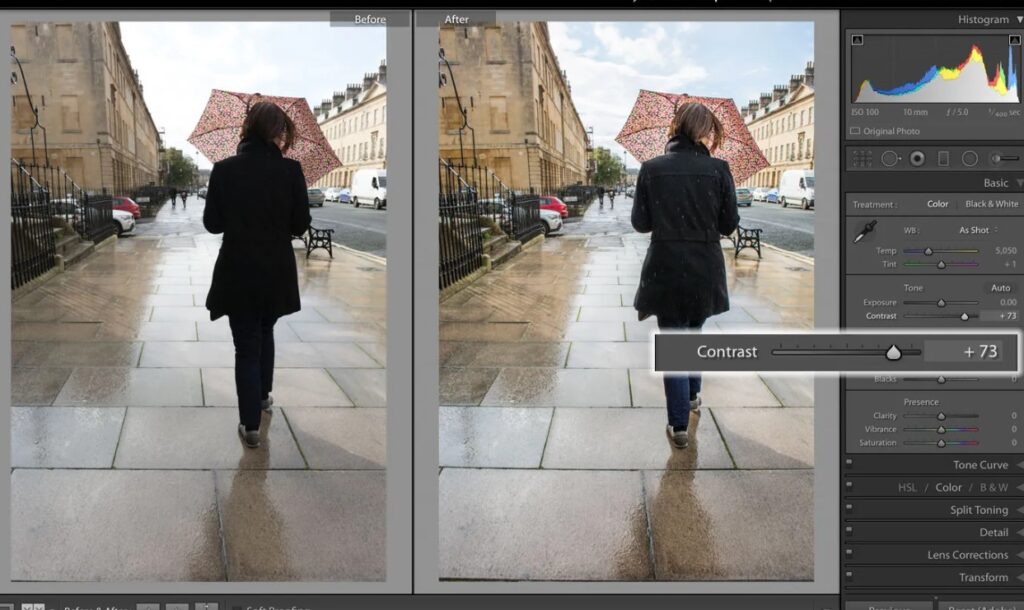
Optimizing Contrast can help create a more visually pleasing photo by making it more vibrant and crisp-lookingContrastsame time. Lightroom is a compelling image-editing program that offers a wide range of tools and features to help photographers create stunning images. Lightroom’s Contrast tool is beneficial as it allows users to quickly and easily adjust the contrast levels in their photos to make them more visually pleasing.
The Contrast tool can be found within Lightroom’s Basic panel, which is accessible by selecting “Develop” mode from Lightroom’s main window. The Contrast slider can then be adjusted either up or down to increase or decrease the overall contrast level in your photograph. Increasing the Contrast will make the darker tones in your photo appear darker while making lighter tones appear brighter Contrastame time. Similarly, decreasing the difference will have the opposite effect making everything appear softer and less vibrant but still retaining Contrast in both shadows and highlights.
It is important to note that altering a photo’s settings too much can often result in a washed-out or overly darkened final result. Hence, it is best to adjust these settings slowly and carefully to achieve the right balance for each photograph you may be working on. Lightroom also offers integration with third-party plugins such as Topaz Labs, which provide additional noise reduction options if needed, allowing users even more control over their photographs’ exposure settings.
An essential aspect of Lightroom and its many tools, including Contrast, is learning how best to use them and what works best for each particular image you may be workingContrastce no two paintings are exactly alike, it is essential to experiment with different settings until you find what looks best for your specific photo while also ensuring that none of its details are lost. With practice and patience, anyone can master Lightroom, so don’t be afraid to dive in head first!
7. Sharpening & Noise Reduction

Adding sharpening and noise reduction effects will improve an image’s details and remove any digital noise affecting its final look when printed or displayed digitally. Lightroom is a popular image editing program that offers powerful tools that make it easy to adjust sharpening and noise reduction settings for images. Sharpening helps to bring out fine details in a snap, while noise reduction helps reduce unwanted artifacts caused by digital cameras or scanners.
Lightroom includes several different sharpening tools, including Clarity and Sharpen, which allow users to quickly increase the level of detail in their photos while still preserving the overall appearance. Clarity adjusts mid-tones, giving images a more vibrant look with richer tones and sharper edges. The Sharpen tool can then be used to further enhance the photograph’s appearance by increasing Contrast and sharpness where needed. Lightroom also includes a Luminance slider which is helpful for targetiContrastfic areas of an image when fine-tuning details and making them appear more distinct without introducing additional pixelation or blurriness.
Regarding noise reduction, Lightroom has two main options – Lightroom’s Light Noise Reduction tool and its Color Noise Reduction tool, which help reduce digital artifacts without sacrificing too much detail from the original photograph. Light Noise Reduction will help smooth out regions with excessive luminance noise, whereas Color Noise Reduction does the same but reduces chroma (color) noise. Lightroom also lets you adjust how much noise reduction is applied to keep your photo’s natural look without introducing any unwanted artifacts or blurring essential details.
In addition, Lightroom also provides additional tools like Dehaze, Defringe, and Remove Chromatic Aberration, which all work together to improve an image’s overall appearance and ensure all its details are kept intact during post-processing. Dehaze helps reduce any fog or haze in a snap, while Defringe removes any fringing caused by lens defects or chromatic Aberration. Remove Chromatic Aberration is especially useful as it automatically detects chromatic aberrations caused by lenses and corrects them. Hence, they no longer affect your final result when printed or displayed digitally.
Overall, Lightroom provides photographers with powerful yet intuitive tools that adjust sharpening and noise reduction settings easily to create stunning photos with more vivid colors, excellent Contrast, and reduced digital artifacts while preserving essential details!
8. Presets
Creating presets and oContrastavorite effects will allow you to quickly apply them to other images in the future instead of repeatedly making manual adjustments each time you need them used. Lightroom is an intuitive and powerful image editing software that provides users with many tools to adjust their photos. Lightroom has become a staple in many photographers’ workflow thanks to its ability to quickly and accurately edit photos while preserving all the essential details. Lightroom also enables users to create presets of their favorite effects, which allows them to quickly apply these settings to other images in the future without having to make manual adjustments each time.
Creating Lightroom presets is easy and efficient – all you need to do is make the necessary adjustments on one photo, then save those edits as a preset by clicking ‘Create Preset’ from the Develop module. You can choose what specific adjustments should be included in your preset while giving it a unique name so you can easily identify it when you want to use it again. Lightroom also allows you to group your presets into folders for better organization and more accessible access when needed.
When applying, Lightroom presets, it is essential not to forget about making basic exposure adjustments such as white balance, brightness, Contrast, etc., as these will still be necessary no matter how good your preset looks on one image. It’s alContrasttant not to rely too heavily on Lightroom presets, as every photo is different and may require individualized settings for it looks its best.
Once you have created, your Lightroom presets, they can be used repeatedly throughout your workflow, saving you time and energy along the way! Lightroom presets are great for photographers who often shoot similar photos, such as landscapes or portrait photography since they provide a consistent look that doesn’t require any extra effort or adjustment each time they are applied. Additionally, Lightroom presets allows photographers to experiment with different styles and effects without worrying about introducing unwanted artifacts or losing essential details – making them even more invaluable for post-processing!
9. Local Adjustments & Selective Editing Tools
Experiment with local adjustments such as selectively brushing parts of an image, vignetting or dodging/burning techniques, etc., as they can add extra depth and character to your photos when used right! Lightroom provides photographers with various tools to make local adjustments, such as selectively brushing parts of an image, vignetting, and dodging/burning techniques. Lightroom’s powerful Selective Editing tools allow you to easily make precise adjustments to specific areas of your pictures with simple brush and gradient tools.
With Lightroom’s Brush tool, you can apply effects like clarity, sharpening, Contrast, or exposure to select parts of an image without affecting the rest – giving you complete control over Contrast these effects are applied. Lightroom also offers a Graduated Filter feature which is great for making subtle adjustments, such as adjusting the exposure on one side of an image while leaving the other unaffected for a more natural look. Lightroom has its Vignette tool that allows you to manually darken or lighten certain parts of an idea to help draw attention toward a particular subject or focal point.
The Dodge & Burn tool lets you lighten or darken specific areas in your photos by allowing you to brush in your preferred effect! This is especially useful when bringing out details in shadows or highlights while preserving texture and tones in other parts of the image. Lightroom also makes it easy to experiment with different looks by allowing you to save your local adjustment settings as presets so they can be quickly applied to other photos later.
Local adjustments are a great way to add extra depth and character to your photos – but it’s important not to overdo it! Lightroom’s Adjustment Brush tool comes with several auto-masking features that can help prevent unintentional edits from being made outside the area intended for adjustment – saving time and reducing mistakes in the process! It’s also best practice when making local adjustments, not just in Lightroom but across all photo editing software – that less is often more! Making too many changes can lead to unwanted artifacts or noise appearing in the final result, which will take away from the overall quality of your photos instead of adding anything unique.
Experimenting with local adjustments can be fun and rewarding if done correctly – but remember, not everything needs adjustment, as some images may look better left untouched! With Lightroom’s intuitive interface and wide range of powerful yet user-friendly editing tools, photographers have all they need to get creative with their post-processing workflows.
10. Export Your Work For Sharing or Printing
Once you’re done working on a photo, remember to export it in the highest quality possible before sharing or printing so that its full potential is realized! Lightroom is a powerful post-processing software designed to help photographers create stunning images from their raw files.
Lightroom offers a variety of tools that make it easy to adjust
- Colors
- Exposure
- Brightness
- Contrast
- And more
For ultimate control over your photos. Lightroom also has a range of powerful yet user-frContrastelective editing tools, such as the brush and gradient filters, allowing you to make localized changes without affecting the rest of the image. Lightroom’s intuitive interface allows users to quickly and easily apply any edits they desire with minimal effort.
Once you’ve finished making adjustments and are ready to share or print your photo, it’s important to export it in the highest quality possible to preserve its full potential. Lightroom makes this easy with an Export feature that allows you to choose the output settings that best suit your needs. Lightroom can export photos in various formats, such as JPEG, TIFF, PSD, and PNG, while also allowing you to adjust resolution and compression levels depending on how you intend to use the image. It’s important not to reduce the quality too much when exporting, as this can lead to artifacts appearing in your final result, which will ruin all the hard work you’ve put into perfecting your photo.
Lightroom also gives users control over color space settings when exporting by allowing them to select either sRGB or Adobe RGB standards for optimal results when sharing online or printing out their photos. Lightroom also enables users to customize naming conventions for their exported files to keep track of them more efficiently and apply watermarks if desired. Lightroom even offers a batch processing feature so multiple images can be exported simultaneously with the same or different settings – saving time and increasing efficiency in post-processing workflows!
By taking advantage of Lightroom’s full range of features, photographers have complete flexibility over their post-processing workflow – ensuring their photos reach their full potential before sharing or printing!
Conclusion
Lightroom is a potent and versatile post-processing tool that can help photographers quickly transform raw files into stunning images. With Lightroom’s intuitive interface, user-friendly editing tools, and the ability to customize output settings for optimal results when printing or to share online, Lightroom provides a comprehensive suite of features that make it easy to get creative with your post-processing workflows. We have outlined in this article that by taking advantage of these Lightroom tips for beginners, you can confidently use Lightroom like a pro! So don’t wait any longer – start exploring Lightroom today and see what amazing photos you can create!
What is Adobe Lightroom?
Adobe Lightroom is a powerful photo-editing software that allows users to edit, organize, and share photos easily. It is available for both desktop and mobile devices.
What are the different versions of Lightroom available?
Lightroom comes in three versions: Lightroom Classic, Lightroom CC (formerly known as Creative Cloud), and the mobile app, a free version with basic editing features.
How do I install and activate Lightroom?
To install and activate the full version of Lightroom, you can purchase it directly from Adobe or an authorized reseller. The activation code must be redeemed within 30 days of purchase.
How do I update my version of Lightroom?
You can update your copy of Lightroom by opening the software and clicking on “Help” then “Check for Updates”. This will prompt you to download the latest version available for your system.
What file formats can be imported into Lightroom?
Lightroom supports a wide range of image formats, including RAW files from many makes and models of digital cameras’ and JPEGs, TIFFs and HEIF files from iOS devices like iPhones or iPads.
How do I organize and manage images within Lightroom?
Lightroom has built-in tools that make organizing your photos easy; you can tag images with keywords or labels, rate them based on quality, add location information when available and create collections to hold related images together in one place.
Are there any good tutorials on how to use Lightroom?
Yes! There are plenty of online tutorials about how to use Lightroom; many video tutorials are available through Adobe’s website and YouTube channels such as Will Carnahan’s One Minute Photoshop Lesson series.
What types of image manipulation can be done in Lightroom?
Lightroom offers a variety of image manipulation tools such as exposure adjustment, tone curve editing, white balance adjustments and sharpening/noise reduction tools, among other things – depending on which version you’re using, some more advanced features may also be available such as image stacking or HDR toning options.
Do I need an Adobe Creative Cloud plan to use Lightroom?
No – however, if you have an active subscription for the Creative Cloud Photography Plan, you’ll gain access to additional advanced editing features that aren’t included in the regular versions of Lightroom (such as Shake Reduction).
Does Lightroom have printing capabilities?
Yes – Lightroom includes tools for creating prints from your digital photos, including templates for making contact sheets with multiple images in columns or grids; it also provides support for various popular print services so you can quickly order prints directly from within Lightroom without having to leave the program.